

Blog Evolution #2: AI Agent Optimization
 Blogumun Evrimi #2: Yapay Zeka Ajanı Optimizasyonu
In the second step of my blog’s evolution, I will focus on AI agents that have become an essential part of this new world and how ready our websites are for these new visitors.
Until now, we have optimized our websites for search engine bots to handle SEO, and for humans to ensure a great reading experience. However, we now have autonomous entities (AI Agents) that don’t just read; they make decisions, synthesize information, execute actions, and “experience” the internet on our behalf. If your digital presence is optimized solely for human clicks and scrolls, you are essentially closing your doors to this new and aggressively growing user base.
By nature, my blog is built on the Hugo architecture, which is fundamentally focused on speed and performance. This lightweight footprint, generated as a static site by Hugo, offers an excellent experience for human visitors. But what happens when it is crawled through the eyes of an artificial intelligence agent? What does an LLM or an AI Agent actually see when it lands on my blog?
Cloudflare Service: Is Your Site Agent-Ready?
Cloudflare offers a dedicated service to analyze how artificial intelligence agents perceive websites. This tool, called Is Your Site Agent-Ready?, provides a comprehensive report showing how well your site can be crawled and understood by AI agents. I used this service to test how ready my blog is for these AI visitors.
I must admit, the results were not very bright. According to Cloudflare’s report, my blog had serious shortcomings regarding being crawled and understood by AI agents. In this post, I will share step-by-step how I addressed these deficiencies, the optimizations I made, and how my blog became more “agent-ready” against artificial intelligence agents.
Let’s Get Started…
Let’s test my blog first. However, there is an important point here, which is to select the correct Site Type by clicking “Customize scan”.
My blog is a Content Site, which means it is a content-focused website. If I run all the checks, it will also expect things like API Catalog, OAuth, and UCP, which are not very meaningful requests at the moment.
I typed in my blog’s address and clicked the “Scan” button. When I first did it without selecting the site type, the score was only 8. Honestly, when I saw the score, I couldn’t help but say, “No way!”
robots.txt
It turned out my blog didn’t have a robots.txt file; sometimes we overlook such basic things. That is why these kinds of tests are a great way to catch these fundamental omissions.
In Hugo, when you add enableRobotsTXT = true inside hugo.toml, a basic robots.txt file is automatically generated.
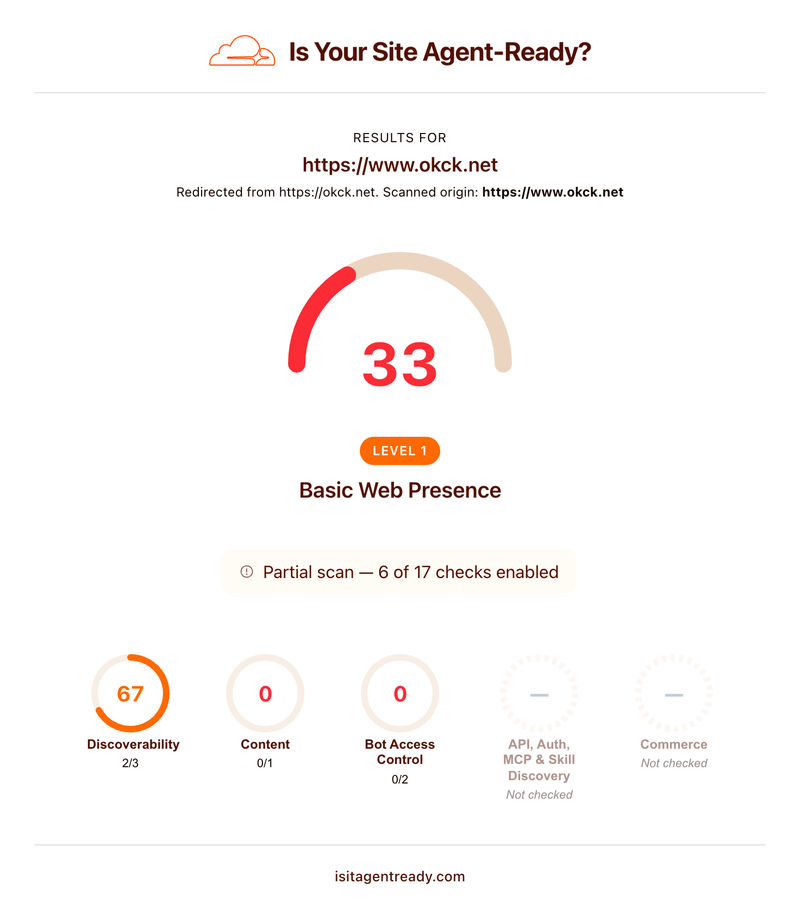
However, this basic setup only increased my blog’s Agent Ready score by 9 points and failed to clear the following errors:
- “No AI-specific bot rules and no wildcard rules in robots.txt”: There are no specific rules for AI agents and no wildcard (*) rules in the robots.txt file. This creates ambiguity about which pages AI agents can access.
- “No Content Signals found in robots.txt”: The robots.txt file does not contain content signals aimed at AI agents. This makes it harder for agents to understand which type of content is important.
So, I changed the enableRobotsTXT value in the hugo.toml file to false and customized it by adding a static/robots.txt file as follows.
User-agent: *
Allow: /

# AI Content Usage Preferences
Content-Signal: ai-train=no
Content-Signal: search=yes
Content-Signal: ai-input=yes

# Sitemap
Sitemap: https://www.okck.net/sitemap.xml
These customizations managed to boost my score by exactly 33 points, bringing it up to 66. Lifting the score significantly with such a simple change really put me in a great mood.
Link Headers
Instead of parsing the entire HTML document to understand a website’s architecture and content, AI bots and autonomous agents primarily check the Link headers (RFC 8288) in HTTP responses. The “missing or invalid Link header” warnings encountered in Cloudflare’s “Is It Agent Ready?” tests stem precisely from the lack of this semantic optimization.
Initially, my blog’s HTTP responses did not include a Link header pointing to the sitemap.xml file. However, the rel=“sitemap” attribute, which is a de facto standard for traditional search engines, is not enough on its own. This is because this relation type is not registered as an official “relation type” for autonomous agents or data discovery in the IANA (Internet Assigned Numbers Authority) registries. To successfully pass Cloudflare’s tests and provide meaningful data to LLM crawlers, you must also include the site’s machine-readable native output, the RSS feed, using the IANA-approved rel=“alternate” relationship within this header.
To implement this optimization on my Hugo blog hosted on Netlify, adding the following configuration to the netlify.toml file was one option:
[[headers]]
  for = "/"
  [headers.values]
    # Retaining sitemap for traditional search engines
    # Using IANA-registered 'alternate' for structured RSS data
    Link = '</sitemap.xml>; rel="sitemap", </index.xml>; rel="alternate"; type="application/rss+xml"'
However, to maintain infrastructure independence and avoid being directly dependent on Netlify configuration files, I chose a more portable method and added the following to the static/_headers file:
/
  # Retaining sitemap for traditional search engines
  # Using IANA-registered 'alternate' for structured RSS data
  Link: </sitemap.xml>; rel="sitemap", </index.xml>; rel="alternate"; type="application/rss+xml"
During the build process, Hugo moves this file from the static folder directly to the root directory (public/), and Netlify automatically recognizes this standard file to apply the HTTP header rules at the server level.
After applying this optimization, the missing Link header warning in the Cloudflare tests disappeared, allowing my blog to be better crawled by artificial intelligence agents. These kinds of semantic optimizations increase your site’s accessibility and visibility not just for human visitors, but also for the internet’s new autonomous users.
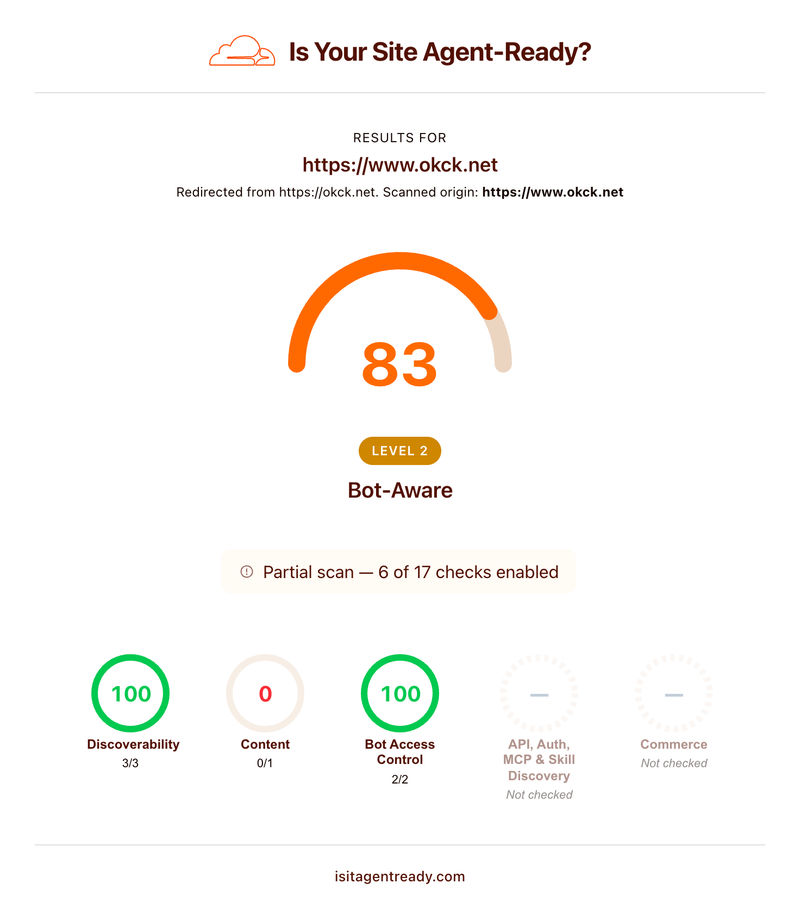
After this change, I tested how ready my blog was against AI agents once again, and my score increased by another 17 points, reaching 83.
Markdown Negotiation
The final optimization parameter for my blog was the Markdown Negotiation protocol. Since I use Cloudflare DNS, I solved this with Cloudflare Workers. However, it is also possible to handle it directly on Hugo, though it requires quite a bit of effort when it comes to configuration.
Defining a Custom Output Format
First, you need to configure a custom MIME type and Output Format in your hugo.toml file that browsers and agents will recognize:
[mediaTypes."text/markdown"]
  suffixes = ["md"]

[outputFormats.CustomMarkdown]
  mediaType = "text/markdown"
  baseName = "index"
  isHTML = false
  fromLayout = true
Setting Up Output Permissions for All Page Types
Next, you need to tell Hugo to generate both HTML and this new Markdown format for the homepage, single pages, sections, and taxonomies:
[outputs]
  home = ["HTML", "CustomMarkdown"]
  page = ["HTML", "CustomMarkdown"]
  section = ["HTML", "CustomMarkdown"]
Designing a .md Layout for Each Page Template
This is the most tedious part. By default, Hugo uses .html templates. To generate Markdown output, you must create a separate template file for each architectural piece under your layouts/ folder (for example, placing layouts/_default/single.md right next to layouts/_default/single.html). Inside these templates, you need to write layout functions that exclude HTML tags entirely and output completely raw Markdown code.
Setting Up Content Negotiation on the Hosting Side
At the end of all these processes, Hugo will generate an index.md file right next to the index.html file for every post. However, it doesn’t end there. When an incoming agent makes a request to okck.net/hugo-blog with an Accept: text/markdown header, the server (Netlify) needs to automatically redirect it to the okck.net/hugo-blog/index.md file. You would have to solve this on the Netlify side with complex _redirects rules, or through complicated code within .htaccess.
Implementing Markdown Negotiation with Cloudflare Workers
I solved this routing process using Cloudflare Workers. Cloudflare Workers intercepts incoming HTTP requests, allowing you to route them with custom logic. By using a lightweight Worker rule that catches agent requests coming in with the Accept: text/markdown header, we can intercept them and immediately convert the HTML content into a clean Markdown structure, resolving this issue at its root.
Creating a Cloudflare Worker
- Log in to the Cloudflare Dashboard.
- Go to the “Workers & Pages” section from the left menu and click the “Create Application” button.
- Select the “Create Worker” option, give your Worker a name (e.g., hugo-markdown-negotiation), and deploy it.
- Once the Worker is created, click the “Edit Code” button, delete all the existing code inside, and paste the following optimized JavaScript code:
export default {
async fetch(request, env, ctx) {
const response = await fetch(request);
const acceptHeader = request.headers.get("Accept") || "";
const isMarkdownRequest =
acceptHeader.includes("text/markdown") &&
response.headers.get("Content-Type")?.includes("text/html");
if (!isMarkdownRequest) return response;
const html = await response.text();
const markdown = htmlToMarkdown(html);
// Preserve all original headers, only override what's necessary
const newHeaders = new Headers(response.headers);
newHeaders.set("Content-Type", "text/markdown; charset=utf-8");
newHeaders.set("X-Markdown-Source", "cloudflare-worker");
if (!newHeaders.has("Cache-Control")) {
newHeaders.set("Cache-Control", "public, max-age=14400");
}
return new Response(markdown, {
status: response.status,
statusText: response.statusText,
headers: newHeaders,
});
},
};
function htmlToMarkdown(html) {
let md = html;
// 1. Remove noise blocks before any other processing
md = md.replace(/<script[\s\S]*?<\/script>/gi, "");
md = md.replace(/<style[\s\S]*?<\/style>/gi, "");
md = md.replace(/<nav[\s\S]*?<\/nav>/gi, "");
md = md.replace(/<footer[\s\S]*?<\/footer>/gi, "");
md = md.replace(/<header[\s\S]*?<\/header>/gi, "");
md = md.replace(/<aside[\s\S]*?<\/aside>/gi, "");
md = md.replace(/<figure[\s\S]*?<\/figure>/gi, "");
// 2. Fenced code blocks — must run before inline code to avoid double-backtick corruption
md = md.replace(
/<pre[^>]*><code[^>]*>([\s\S]*?)<\/code><\/pre>/gi,
(_, code) => "```\n" + decodeEntities(code.trim()) + "\n```\n\n"
);
// 3. Inline code
md = md.replace(/<code[^>]*>([\s\S]*?)<\/code>/gi, (_, code) => "`" + decodeEntities(code) + "`");
// 4. Blockquotes
md = md.replace(/<blockquote[^>]*>([\s\S]*?)<\/blockquote>/gi, (_, inner) => {
const text = stripTags(inner).trim();
return text.split("\n").map(line => "> " + line.trim()).join("\n") + "\n\n";
});
// 5. Headings h1–h4 collapsed into a single pass
md = md.replace(/<h([1-4])[^>]*>([\s\S]*?)<\/h\1>/gi, (_, level, t) =>
"#".repeat(Number(level)) + " " + stripTags(t).trim() + "\n\n"
);
// 6. Paragraphs
md = md.replace(/<p[^>]*>([\s\S]*?)<\/p>/gi, (_, t) => stripTags(t).trim() + "\n\n");
// 7. Ordered lists — convert li items with incrementing counters before stripping ol wrapper
md = md.replace(/<ol[^>]*>([\s\S]*?)<\/ol>/gi, (_, inner) => {
let i = 0;
return inner.replace(/<li[^>]*>([\s\S]*?)<\/li>/gi, (_, item) => {
i++;
return `${i}. ${stripTags(item).trim()}\n`;
}) + "\n";
});
// 8. Unordered lists
md = md.replace(/<ul[^>]*>([\s\S]*?)<\/ul>/gi, (_, inner) =>
inner.replace(/<li[^>]*>([\s\S]*?)<\/li>/gi, (_, item) => `- ${stripTags(item).trim()}\n`) + "\n"
);
// 9. Inline formatting — bold and italic each collapsed into a single pass
md = md.replace(/<(strong|b)[^>]*>([\s\S]*?)<\/\1>/gi, "**$2**");
md = md.replace(/<(em|i)[^>]*>([\s\S]*?)<\/\1>/gi, "*$2*");
// 10. Images (before links, since img can appear inside anchor tags)
md = md.replace(/<img[^>]+alt=["']([^"']*)["'][^>]+src=["']([^"']+)["'][^>]*/gi, "");
md = md.replace(/<img[^>]+src=["']([^"']+)["'][^>]*/gi, "");
// 11. Links
md = md.replace(/<a[^>]+href=["']([^"']+)["'][^>]*>([\s\S]*?)<\/a>/gi, "[$2]($1)");
// 12. Horizontal rules
md = md.replace(/<hr[^>]*>/gi, "\n---\n\n");
// 13. Strip all remaining tags
md = stripTags(md);
// 14. Decode HTML entities
md = decodeEntities(md);
// 15. Normalize excessive blank lines
md = md.replace(/\n{3,}/g, "\n\n").trim();
return md;
}
function stripTags(html) {
return html.replace(/<[^>]+>/g, "");
}
function decodeEntities(str) {
return str
.replace(/&/g, "&")
.replace(/</g, "<")
.replace(/>/g, ">")
.replace(/"/g, '"')
.replace(/'/g, "'")
.replace(/ /g, " ")
.replace(/—/g, "—")
.replace(/–/g, "–")
.replace(/…/g, "…");
}
- Save your code and deploy it.
Binding the Worker to Your Site’s Domain
To make this rule work on your blog, we need to define its route:
- Select your site in the Cloudflare Dashboard (okck.net).
- From the left menu, click on “Websites,” then select your site and go to the “Workers Routes” tab.
- Click on “Add Route.”
- Fill in the settings as follows:
- Route: www.okck.net/* (and if you use non-www, you can add a second rule for okck.net/*).
- Worker: Select the Worker you just created (hugo-markdown-negotiation).
- Click “Save.”
And the Final Score…
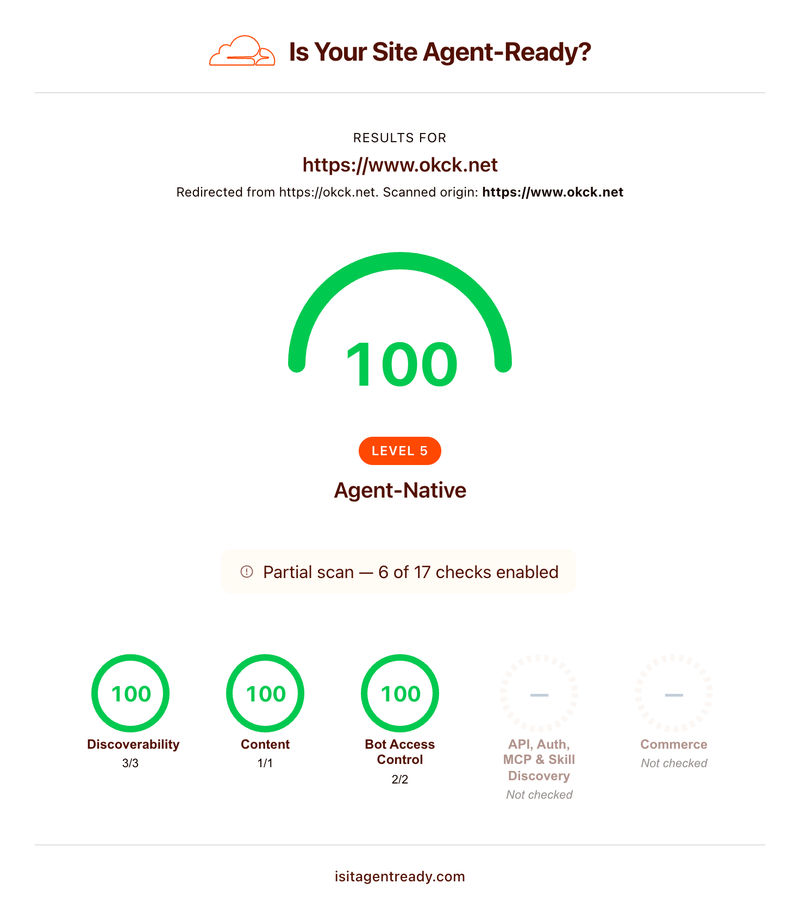
After implementing this optimization, I tested how ready my blog was against AI agents once more, and my score increased by another 17 points, reaching a perfect 100. Now, my blog has become fully crawlable, understandable, and usable by artificial intelligence agents.
Summary
I used Cloudflare’s “Is It Agent Ready?” service to test how ready my blog was for artificial intelligence agents. In the initial test, the score was only 8, but by adding and properly configuring robots.txt, optimizing the Link headers, and implementing Markdown Negotiation, I managed to bring the score up to 100. This process ensured that my blog became accessible and usable not just for human visitors, but also for the internet’s new autonomous users.